I am personally developing the following Omikuji application for smartphones using Flutter.
[iOS]
https://apps.apple.com/us/app/%E5%A4%A7%E5%BE%A1%E5%BF%83%E3%82%A2%E3%83%97%E3%83%AA/id1627544916
[Android]
https://play.google.com/store/apps/details?id=jp.sikisimanomiti.oomigokoro
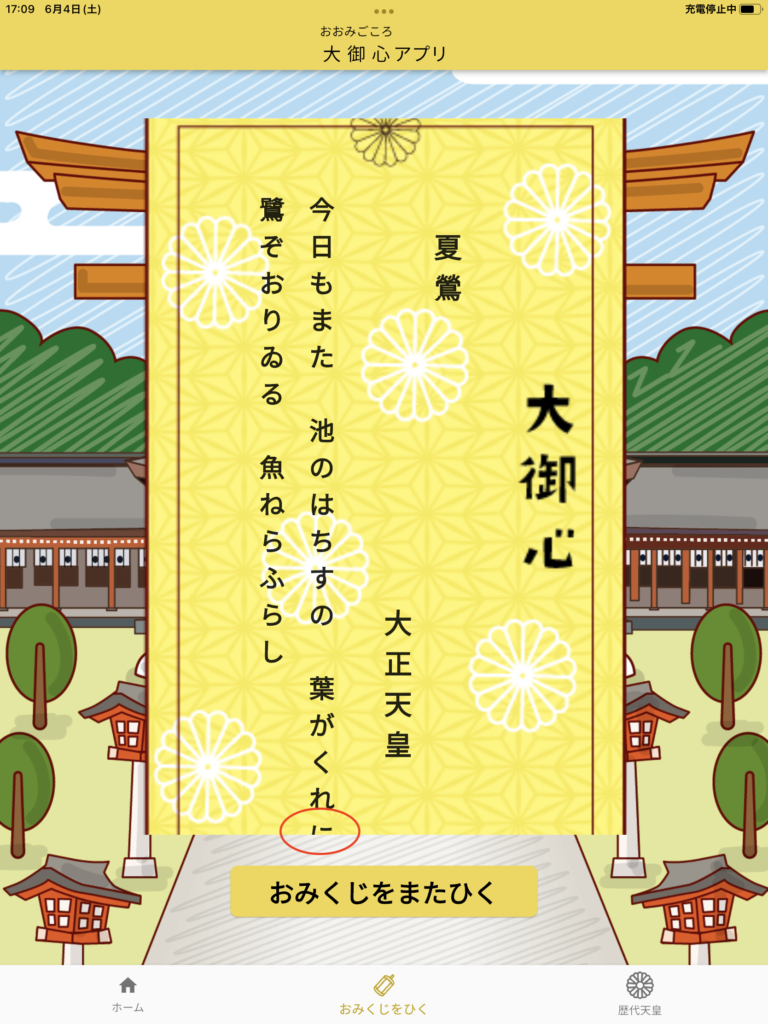
The first time I submitted my application to Apple for review as an iOS app, it was rejected with the following message and screenshot in “App Review”.
Guideline 4.0 - Design


We noticed that several screens of your app were crowded or laid out in a way that made it difficult to use your app.

Next Steps

To resolve this issue, please revise your app to ensure that the content and controls on the screen are easy to read and interact with.

Resources

(The following is omitted)
They went out of their way to tell me where the text was missing by circling it in red.
I don’t know how Apple reviews, but from the above message, I felt that they are checking the operation on various devices.
I didn’t want to get the same kind of criticism again. So I decided that if Apple was checking the operation on various devices, I should also limit the screen display on multiple devices, so I started up a simulator for iPhones and iPad with different screen sizes to check the screen display.
However, since it takes some time to start up the simulator and there are about 15 different screen sizes to be checked on the iPhone and iPad, and since I must do it every time the screen is modified, I thought it would be tedious to do it manually.
I thought that if I could automatically launch the simulator, start the app, open the screen, and take a screenshot, I would only have to check the screenshot I took, so I thought it would be easy. So I created a system to automatically take screenshots of the app using Flutter’s integration testing. Then, I made a system to automatically take a screenshot of the app using Flutter’s integration testing.
Environment
| Tool | Version |
| Mac | macOS Monterey 12.3.1 |
| Flutter | stable 3.0.2 |
| Android Studio | 2021.2 |
| Xcode | 13.3.1 |
Getting Started
1. Add a package
Add integration_test to dev_dependencies in pubspec.yaml.
dev_dependencies:
  flutter_test:
    sdk: flutter

  integration_test:
    sdk: flutter
2. Create a test file
Create a folder named test_driver directly under the project root.
Describe the screen operations you want to perform automatically in a test file, such as main_test.dart below, and store it in the created folder.
main_test.dart
import 'dart:io';

import 'package:flutter_driver/flutter_driver.dart';
import 'package:test/test.dart';

void main() {
  late FlutterDriver driver;
  const path = "test_driver/screenshots";

  setUpAll(() async {
    driver = await FlutterDriver.connect();
    final health = await driver.checkHealth();
    if (health.status == HealthStatus.bad) {
      fail("FlutterDriver fails to start.");
    }
    sleep(const Duration(seconds: 3));
  });

  tearDownAll(() async {
    driver.close();
  });

  test("take home screenshot", () async {
    String device = await driver.requestData("");

    await _doScreenShot(driver, path, "$device-home");

    // I set the key "sample-icon" to the icon so the test can tap the icon.
    await driver.tap(find.byValueKey('sample-icon'));

    sleep(const Duration(seconds: 3));
  });

}

// take a screenshot.
Future<void> _doScreenShot(
    FlutterDriver driver, String path, String fileName) async {
  await driver.waitUntilNoTransientCallbacks();
  final picture = await driver.screenshot();
  final file = File("$path/$fileName.png");
  await file.writeAsBytes(picture);
}
By setting the device’s name in an environment variable, obtaining it in the main function, and returning it to the test, the test can save a screenshot image with the device’s name. If there is a later problem with the screen display, we can identify the terminal that had the problem.
main.dart
Future<void> main() async {
  enableFlutterDriverExtension(handler: (request) async {
    return const String.fromEnvironment('DEVICE');
  });

  runApp(const MyApp());
}
Once you create the above file, launch the Android simulator and hit the command flutter drive --target=lib/main.dart --dart-define="DEVICE=Pixel_3a". The test creates a screenshot image file (e.g., Pixel_3a-home.png) to be named with the prefix “Pixel_3a” specified in the DEVICE environment variable.
3. Create a shell file
To run the integration test created in step 2 on various devices simultaneously, making the following shell in the project root.Set the devices’ ID and name to the variables android_devices and ios_devices.
For Android, set the id of the AVD you created, and for iOS, set the ID in “Devices” in the result of running xcrun simctl list.
integration_test.sh
#!/bin/sh

android_devices=$(cat << EOA
[
  {
    "id": "Pixel_3a_API_30",
    "name": "Pixel_3a_5.6"
  }
]
EOA
)

ios_devices=$(cat << EOI
[
  {
    "id": "3825C629-9256-479A-A0C4-255CAA84C746",
    "name": "iPhone_SE_3rd_4.7"
  }
]
EOI
)

DEVICE_ID=""
DEVICE_NAME=""

# Android
for android_device in $(echo $android_devices | jq -c '.[]'); do
  DEVICE_ID=$(echo $android_device | jq .id | sed -e 's/^"//' -e 's/"$//')
  DEVICE_NAME=$(echo $android_device | jq .name | sed -e 's/^"//' -e 's/"$//')

  sleep 5s
  // launch emulator
  flutter emulators --launch $DEVICE_ID
  sleep 5s
  // run test
  flutter drive --target=lib/main.dart --dart-define="DEVICE=$DEVICE_NAME"
  adb emu kill
done

sleep 30s

# iOS
for ios_device in $(echo $ios_devices | jq -c '.[]'); do
  DEVICE_ID=$(echo $ios_device | jq .id | sed -e 's/^"//' -e 's/"$//')
  DEVICE_NAME=$(echo $ios_device | jq .name | sed -e 's/^"//' -e 's/"$//')

  sleep 5s
  // launch simulator
  open -a Simulator --args -CurrentDeviceUDID $DEVICE_ID
  sleep 5s
  // run test
  flutter drive --target=lib/main.dart --dart-define="DEVICE=$DEVICE_NAME"
  killall "Simulator"
done
Once you create all the above files, you can run the integration test on various devices by executing “sh integration_test.sh” in the project root many times.
Finally
Thanks to the above mechanisms, the test takes screenshots when I execute the shell, go out to eat, and come back. It is much easier now.
We were also able to deal with above Apple’s feedback, and we were able to pass the review and release it.


コメント